Penny
Wood Gas Backpacking Stove
"...a couple of test burns... you will have a very efficient stove with (little) smoke, which lets you boil 20-40 oz of water with little more than two hands full of small woodsticks."
stefan
"The Penny Wood is a killer stove; the Bushbuddy Ultra boils 1qt just like the Penny (~9:30) but weighs 5oz. and costs $145. The Penny is 'free' and weighs less than 3oz. What a deal!"
Mike Elliott
|
| |
By Mark Jurey
Originally the Penny
Alcohol Stove was to work as a backup for a small ultralight 3 oz.
wood backpacking stove. Since the Penny was so successful, and the wood stove development
so frustrating, things soon got reversed. After years of trying
to get tiny backpacking stoves to burn clean, it was the Zen
Alcohol Stoves and Ray
Garlington sites that finally outlined the solution and brought
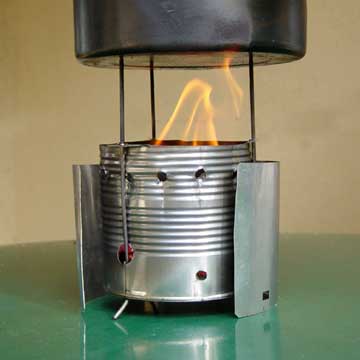
my design together. This is a variation of a wood gas or TLUD gasifier (Top-Lit UpDraft) stove. It uses a top down burn and hot air injectors to produce a clean efficient flame. As shown below, it was designed to fit my specific needs but many variations are possible and each shows a similar efficiency.
I have heated my home with wood for over 35 years and my first home stoves were metal boxes with ways to control the air supply. Newer stoves, like the one I use today, are extremely clean burning and over 80% efficient. The Penny Wood stove has the same features found in these, including; 1- a slow controlled primary burn to release the wood gasses, 2- hot air secondary injectors to burn these gasses, 3- a double wall area to hold heat in the wood and heat the secondary air supply.
I now bring the wood stove, and on some
trips even leave the Penny and alcohol home. When I take both, I leave
the Penny pot support (1 oz.) at home. I use the Wood stove (3 oz.)
with stakes reversed as a pot support for the alcohol burner (see below).
So, for 2 oz. more weight (or 2 oz. less alcohol) I have an unlimited
heat source. If I'm above the tree line or want quick heat, I use the
alcohol. If I have the time, or the weather turns bad, or snow is the
only water source, I burn wood.
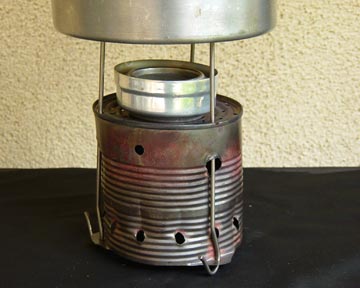
The stakes are reversed to support the pot 1" above the top rim of the Penny
Alcohol stove (shown are 6" titanium stakes, see below).
There's nothing like a warming fire at
the end of a day of hiking. Often, one night of cooking over an open
fire is enough to convince the bugs to go away for the remainder of the trip. A little black on the
pot is the only down side and that can be handled by packing in a plastic
bag or liquid soap on the pot. The pot and stove are usually very clean at the end of a burn
- little tar or soot and only a hand full of white ash. I usually wipe
the stove and pot with some TP then save the TP to help start the next
fire.
Update -
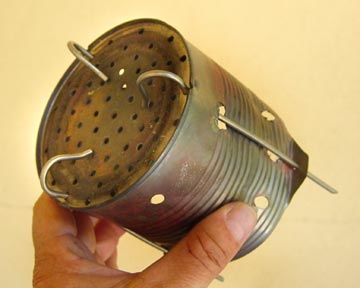
Recently I replaced the drip irrigation stakes with stock 6" titanium stakes from GossamerGear.com (shown above). They are a lighter, stronger, require no cutting, and they make better tent/tarp stakes. Because of the curved shape, the titanium stakes still support the pot 1" above the alcohol stove if the Penny's Base is not used. |
|
|
| |
*
Stove and shield fit inside a 2 quart Open
Country
or AntiGravityGear pot.
*
Boil one quart with one fill and no adjustments.
*
Additional fuel easy to add for continuous burn.
*
Stable base and pot support for alcohol stove.
*
Efficient and no smoke burn.
*
Leave no trace.
|
| Specifications
and Performance |
| |
Tomato Can
-
(trader Joe's Marinara Sauce)
4" dia. cut to fit into the pot (3-3/4" high after tabs are bent).
Three steel stakes -
6-1/2" long drip irrigation stakes with 3/4" long 45°
bend on one end,
or, 6" titanium stakes from GossamerGear.com
Total weight -
less than 3 oz.
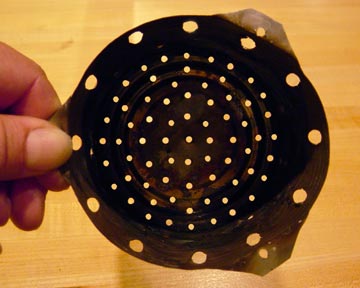
Looking into the can top you can see about 70 - 1/8" holes
in bottom - large enough to let in air but small enough to hold the
ash.
Note the 12 - 1/4" holes just below the rim. After
drilling, they were bent down using the drill bit. This helps scoop hot secondary
air from the sides of the stove and shoot them onto wood gas from the
primary burn.
Not showing are the three 1/4" and three 1/2" side holes near the bottom. Both provide additional primary air.
Don't forget the heat shield, with holes along the bottom - it's necessary to heat the wood and create a chimney effect between the stove and shield that provides hot air for the secondary jets at the top. A fuller shield will work better, this one is an aluminum dryer vent.
When drilling, I suggest that you use a set or nail to
mark the spot, drill slowly but keep the bit moving at a high RPM and
wear gloves. Use a round file to smooth all holes and cuts. Many builders recommend you use a step drill bit!!!

|
| |
WARNING!!!
The pot support stakes used for this stove could be VERY DANGEROUS when the pot is removed. Falling on the stove could cause major damage. Always remove the stakes or turn the stove on its side or upside down when not cooking. |
| |
Performance
figures -
About the same as the Garlington WoodGasStove and Bushbuddy Ultra. One quart boils in less
than 10 min. and holds a boil for another 5 to 10 min.. Two cups boil in about 5 min. Properly loaded, it can burn smoke
free with lots of blue flame and leaves nothing but
white ash. |
| |
Notes -
1. The stakes support the pot up to 2" above the stove.
This may seem high but it insures complete combustion before gasses
reach the pot. This distance also supports the Penny alcohol stove 1"
below the pot. If you want better efficiency in high winds, the distance
can be reduced.
2. I use the Penny alcohol stove wind
screen around the wood stove to preheat the
air supply for added efficiency. When using the alcohol stove on top
of the PennyWood, I hang the support from the pot with some thin wire.
I take some foil to use if a higher wind break is necessary or to put
under the stove if burning on a combustible surface. On a soft or sandy
surface, I use the pot lid under the stove and foil for a lid.
3. Warning! The bent section of the original pot
support stakes can sometimes spin and cause instability. If they do,
file a notch in the bottom rim of the can for them to fit into. |
| |
Filling
and Lighting -
Break pencil size wood 1" to 3" long, shake it down as you
fill and pack it almost to the top. Dribble some alcohol or lamp oil
only on the top and/or light some TP under a wood teepee on top. If
necessary, feed kindling until top is fully lit. The secondary
air holes will help to provide primary air to get things going. After
the top wood is completely lit, put the pot on and enjoy the show. Adjust
the next fill as outlined below.
To keep it light and simple this stove has no air adjustments.
The primary air comes up through and around the wood pile. The tighter
the fuel is packed, the less air moves through, and the slower the burn.
If it's too slow (or the wood too green or wet) just blow into one of the bottom
holes to speed up the burn. I use a water purifier hose - Steve the goat man uses a flex straw "to get things going quickly and for a quick restart when she about out". You
can also turn or raise the wind screen to let wind blow into the bottom
holes. Loosely packed chunks of wood can provide too much air. They
may flame up faster than the secondary air supply can consume all of
the soot.
Different fuels (pine, oak, etc.) have different air supply
needs as well. I have tested this stove with everything from wood pellets
to very dry oak. Both will work and with some experience you should
soon find the best way to load and pack each. With a proper burn there
is no smoke and almost no soot on the pot. A slow burn is better because
you can always add extra air at the bottom when needed. If you find
that you want more primary air, add more 1/4" holes in the side
near the bottom or more 1/8" holes in the bottom. Also, It's sorta counter intuitive, but it takes a slower burn to heat more water because heat can transfer to the water only so fast - any extra heat is waisted.
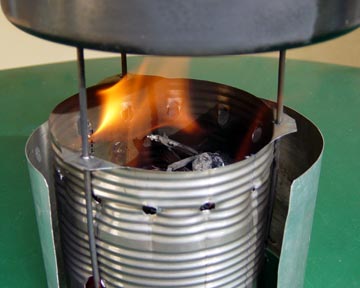
This shows the secondary air holes shooting jets of hot
air into the flame to consume the wood gasses released with a slow burn
- the actual blue alcohol like flames, are invisible in the light.
If you want a longer burn, add several sticks at a time
before the first wood turns completely to charcoal. The stove heat and
gasses will keep the process going with little smoke or soot. If the
wood does not light immediately, blow in a bottom hole. If it smokes
some it's not a problem. The water should be boiling by then and a little
wood smoke on the marshmallows only adds to the ambiance.
I suggest that you visit Zen
Alcohol Stoves and Ray
Garlington sites for information on "inverted downdraft gasifier"
technology. |
Web Reviews |
| |
"Yesterday I had the opportunity to build a Penny Wood Stove. Talk about easy! The hardest part was using the nailset to mark so many holes...
"The Penny Wood is a killer stove; the Bushbuddy Ultra boils 1qt just like the Penny (~9:30) but weighs 5oz. and costs $145. The Penny is 'free' and weighs less than 3oz. What a deal!"
Mike Elliott
~
"... My fellow scoutmaster and I tinkered for many nights with the penny alcohol stove and wood stove and not only did we have a lot of fun working on the project, but developed some skills we could share with the youth on our troop. I made some modifications to the wood stove and incorporated the use of the penny stove into it as well, then field tested the units at elevations from 7,000 to 14,000+ feet. The penny alcohol stove performed spectacularly on Mt. Whitney, but I tired to use the wood stove as much as possible to conserve the limited amount of fuel I had brought. As it turned out, the penny stove was so efficient that I had about 5 oz. remaining when we finished...."
Mike Lancaster, Aka Mountainman Mike, ASM Troop 354, Clovis, CA
~
"I made the wood stove you described on your website and was astounded at the performance. Till now I've used single burner campfuel stoves but can see them taking a back seat to your stove... I am a convert to your stove, I really think it is awesome that you can take a tin can, drill holes in it and rival a stove that's worth over $100 - congratulations."
Bryan (from Alberta Canada)
~
"if you are planing to make a woodgasstove, I would recomend the design from mark jurey.... it is amazingly simple and works without fan and batteries (which most other woodgasstoves need).
...once you did a couple of test burns... you will have a very efficient stove with (little) smoke, which lets you boil 20-40 oz of water with little more than two hands full of small woodsticks."
stefan
~
"Cheers Mark, I made the wood burning stove earlier today - very nice indeed - again, thanks for the instructions. Reckon I'll use for trips with my friends but take the Penny Stove for lightweight camping on my own (once I've made it)"
Jon
~
Congratulations for an inspiring stove design. With best wishes and regards,
Dr. N. Sai Bhaskar Reddy GoodStove.com
~
"Some will argue that the penny is a gassifier... it's not (read up on some gassifier theory and you'll see why). However, it is an extremely effecient / simple to build / simple to use raised floor wood stove."
jdmitch@gmail.com
~
"I made a stove when your first design came out and persevered and updated as appropriate. Stove is now “spot on”, and depending on where I am and what I’m doing to the fuel that is available, I have found that Tree Surgeons woodchip burns the best and i keep a bag in the car (to keep dry fuel)as where i live is very wet as it rains a lot (Wales UK). Thanks for the stove."
Simon Cobb
~
"Have you chosen you cooking style? If not, I suggest having a look at freezer bag cooking. If that suits you, then a "penny stove" (not to be confused with a pennywhistle) is my favorite alky burner, the penny wood burning stove a great choice when fuel is readily available and you'll want to boil a bunch of water or cook something that takes longer. ... I'm carrying both the alky stove and the wood stove, so I have options. Not light thinking you say? Perhaps. But the wood stove is for times when fuel is available and dry and I want a longer fire, like to make coffee AND heat water for a meal. I have to refill the alchohol stove between "batches" in that case. The penalty is an ounce or so. So I go with it.
Carey Parks
~
"Hi Mark, Just finished my first PennyWOOD stove and it works great!... These days with no camp fires allowed but stoves are OK? (Hmm does that mean wood stove?) …this micro version is just what doc ordered. The smells and red coals all add to the taste sensation of cooking over a camp fire IMHO. Beats the smell of denatured alcohol any day! BTW I had flex straw handy and found it worked great for blowing in the lower side hole to get things going quickly and for a quick restart when she about out. Thanks for a great KISS design and most of all sharing it with the masses!..."
Steve and his goats <www.angelfire.com/planet/goatman>
~
|
|
| What if I want to use a smaller pot? |
Mike Elliott made several '1/2 Penny Wood Stoves' that can use Heineken/Fosters 24oz. cans, using the same constructions as the regular stove but starting with a 14.5oz steel can, such as one from kernel corn. The finished can weights 1.6oz..
Mike says "stacking the wood in 'pencil-can-style' helps it light better and then it boils 2cups in 9 to 9 1/2min, simmers for another 25min... (the embers were still glowing at that point but there was not enough heat to hold the simmer). This was using a good lid -- either a wide mouth mason jar + disposable aluminum baking sheet on top of a shortened (and thus full diameter) Fosters can, or the original lid that was removed using a side-cut can opener on a full height (original diameter) Heineken can." |
| How can I keep the pot clean |
If the wood is dry, and you loaded it well, you should have very little soot on the bottom. But if this is a problem, Bob Zook from Antarctica reminds us of this trick we learned as Boy Scouts.
"I usually travel with liquid soap verses barsoap for convenience and the thinnest coating of it on the bottom of a pan when cooking on a fire or with a solid fuel tablet stove makes cleaning the pan a breeze. The only thing to watch out for is if you are poring from the pan and the liquid runs down the side and dissolves some of the soap into your food. Try it if you haven't already its pretty amazing." |
| The bottom of the can got so hot it lit the table under the stove on fire! Is this normal? |
I have actually burned it on the top of a painted steel table (see photo) but that is not really a good idea -I was worried that the paint would bubble. Also, with the Ti stakes, it can sit lower and probably would damage the table. So, on a wood or a painted table could cause damage. All stoves should be USED ON A NON-FLAMABLE SURFACE!! - try a rock.
Another thing to consider is that the "heat shield" set at at about 1/2" from the can actually helps cool the can by forcing cool air over the bottom and up the sides of the can as it heats it for the secondary jets. So, without the shield, or with not enough air entering the bottom of the shield, the can will get much hotter on the bottom.
Mike Elliot finds that you "can fire the stove on a wood surface if the stove is placed on a heat shield with a diameter larger than the windscreen/vertical heat shield. I used a circular piece of normal weight aluminum foil and had no trouble firing the stove on a wooden table. I would only do this if absolutely necessary, general follow the recommendation to only fire it on bare dirt or a rock." |
| When adding additional fuel, how do you keep it from going out or flaring up? |
First, if you are planning on cooking for a long time, make sure to add extra wood early - before it quits flaming and starts burning to coals.
Next, always add larger wood pieces and always at least two or three at a time. The reason for this is that the wood is no longer packed together so the usual smaller sticks will immediately flair up with the added heat and oxygen. The reason for several at a time is that they will reflect heat to keep the larger sticks going at an even rate. Again, stack a second group of sticks before the first stop flaming.
This problem shows how well the downdraft technique works as compared to just burning fuel in a regular stove. If you are using this for camping rather than light weight hiking, you could use a larger can. In fact a taller can - like a large coffee can - will work very well if not better and give you a longer burn. Just make more holes in the can.
|
| Are there any improvements I could try? |
The only suggestion I would make is to use a fully enclosed heat shield, this would maximize the hot air supplied to the secondary jets. I would put several large air supply holes at the bottom but only on one side - this way you could toward or away from the wind to control the burn. I find that the 3/4 shield works well enough to provide a clean burn.
Stefan suggested the following changes to the stove:
"I followed Marks design but added another row of secondary airholes at the top (one row half an inch below the rim, the other spaced between the first row but 1 1/4" below the rim). This seemed to help for a cleaner burn." |
| How can I light it using natural materials? |
Tips from Stefan at:
http://groups.yahoo.com/group/BackpackingStoves/message/554
"While playing around with the woodgasstove I tried different stuff to get it lit with things from mother nature. The combination that gave me the best results was pine and birch peel.
Fine dry pine twigs balled to some birdnestlike thight structure (they are very flexible even when dry - maybe due to sap/resin content, which might be the reason it starts the fire so well and gave me sticky hands...) where put on top of fresh birch bark / peel. Peeling off the white bark of the birch requires a knife. One should not cut too deep. If you see green, it is too deep and you might damage the tree. Especially if you peel all the way around, the tree could die! The peel should be of some thickness though (maybe as thick as 5 pages of paper). To light the woodgasstove get enough birchpeel pieces to cover the ready (full of wood) stove. Light the peel at two places. It should start burning nicely. Drop the 'pine twig ball' on top (it should have about the same size as the stove) immediatly. Careful! the ball tends to expand as it is lit, so it is best not to have the stove on an inflammable surface. Of this combination I think birch was most indispensable. I could only imagine to replace it by pure sap/resin which can be found on conifer tree wounds. Things I tried but would not work are: pineneedles and pine without the birchpeel. Maybe it would be usefull to get a reservoir of birchpeel while hiking a 'birchrich' region or off a dead birch." |
| What else can I use to blow into the stove? |
Steve had a great idea:
"I had flex straw handy and found it worked great for blowing in the lower side hole to get things going quickly and for a quick restart when she about out."
|
| |
|
| Norman Stoddard's Foster's Premium Stove |
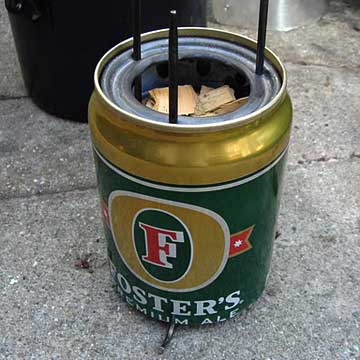 This little beauty seems to be perfect for smaller pots but too unstable for large ones. Note how the Foster's heat reflector completely seals at the top - forcing all the hot air into the secondary air supply holes. Norman built several stoves and this is his description of the process: This little beauty seems to be perfect for smaller pots but too unstable for large ones. Note how the Foster's heat reflector completely seals at the top - forcing all the hot air into the secondary air supply holes. Norman built several stoves and this is his description of the process:
"...I first built a copy of your wood stove and very impressed with it's efficiency and simplicity. I then thought I would want a smaller version to go with a smaller "Primus" pot, that I had gotten for Christmas. So I took a 14.5 oz can and drilled holes in the same configuration as yours but a slight bit smaller because of the reduction in can diameter. I then decided to try a 22 oz can for a heat shield. It worked well but was a little heavy, so I switched to a Foster's aluminum beer can. Worked pretty well and the boil and burn times were about the same as yours. This variation weighed about 2.75 oz.
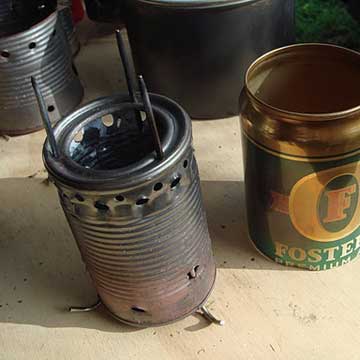
I then played around with another 14.5 oz can (chicken broth) and drilled holes in top rim (bottom of can) for the titanium tent stakes. I had to vent with more holes around top for better combustion and left the rim on another Foster's can for a perfect heat shield fit (gravity not pressed) over the stove.
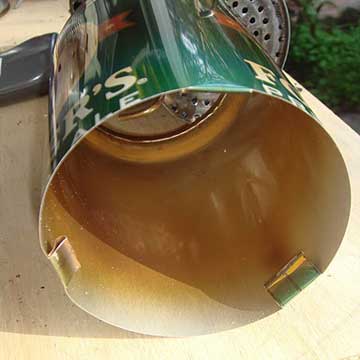
I created some tabs( see pics) in bottom of heat shield to create an even air space at bottom of stove. Again, burn and boil times were consistent with yours and I did notice when flames extinguished and coals were red burning down, I still had a good simmering boil for about 10 minutes with cover on. This variation weighed a shade under 3 oz.
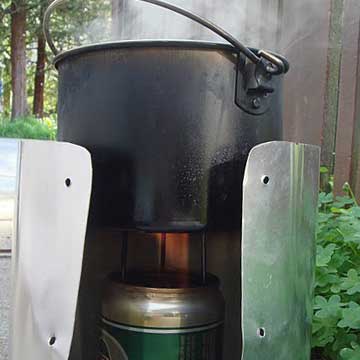
After weighing both the Primus Pot and my old Open Country Pot, I found that the Open Country was slightly lighter and the Foster's Stove fits inside just fine. I think this will be my main stove for backpacking in the High Sierra this summer when below timberline and I'll use an alcohol stove for backup and when above timberline."
Norman Stoddard
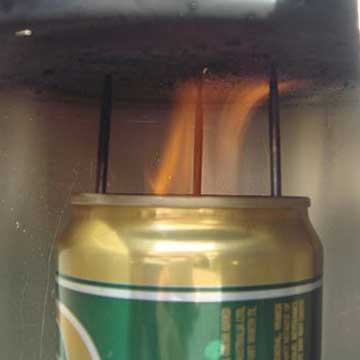
Recent tests by Norman show the following -
Foster's: Heating 2 Cups H2O, Rapid Boil 10 mins, Flame Out @13 mins, Simmer Boil another 10 mins
Penny Wood Gas Stove: 2 Cups H2O, Rapid Boil 7.5 mins, Flame Out @ 10 mins
|
Mike Elliott's
1/2 Penny Wood Stoves |
Pic1
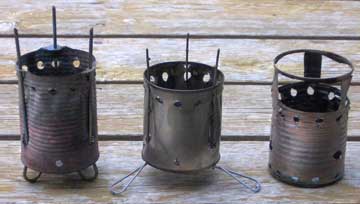
Mike says "I started out replicating the full PennyWood [left, pic1], same hole placement and number, same height, same tabs for pot stand stakes, but using a 14.5oz vegetable can (corn, green beans, etc.).
Pic2
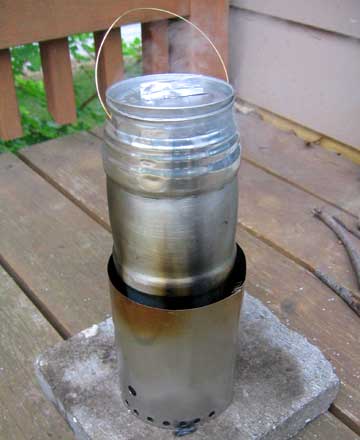
I noticed problems with the wind so I use a taller windscreen/vertical heat shield (dryer vent like Mark's) in order to keep the secondary flames focused on the pot bottom [pic2]. That achieved the burn/boil times mentioned above.
I then wanted to achieve some refinements in usability, stability and packability: i.e. some times I might cook dinner while my tarp is set up so I wont have spare tent stakes, the tent stakes don't make for a wide stove base, and substitute pot stand skewers are too long (6.5in) to pack in the pot along with the stove. So... I tried shortening the whole stove [middle, pic1]. I used a mandarin orange can (same diameter as canned vegetables but only 3.25in high) leaving the top rim intact, the pot stand skewers (4.5in high above the leg bend) go through the can rim instead of bent tabs, and the same number of air holes. I still got the same boil/burn times.
This led me to think "if the burn chamber only needs to be 3.25in tall, and the pot needs to be at least 1.25in above the stove edge, the vegetable can is just the right height (4 3/8in) to serve as a stove and stand." This is my "integrated stove/pot stand 1/2 PennyWood" [right, pic1]. It sits flat on the ground thus I drilled more holes along the base to compensate for the lack of 70 small ones on the bottom. I have only fired it on a cinder block surface [pic2]. Also, the windscreen/vertical heat shield needs a fair number of holes to provide combustion air. The top rim of the can is the perfect diameter to seat the bottom ridge of the canpot. Another benefit is there are fewer parts: no pot stand skewers/stakes to bend or lose.
Summary thoughts:
-The taller windscreen/vertical heat sheild helps keep the flames focused but impedes adding more fuel to extend the burn. I haven't found this to be a problem because one load of fuel burns so long as it is!
-If storing the pot stand skewers in the canpot is not your preference, it might be better to use that setup [middle, pic1] rather than integrated stove/stand [right, pic1] since the base is cooler and you can do wider feet.
-Unfortunately, the diameter of a vegetable can is the same diameter as the opening of a 24oz canpot so my goal of storing the stove in the pot only works if I cut down (shorten and therefore widen) the canpot. Bummer. I want to try grinding the top and bottom side rims of the vegetable can to see if it will slip into the canpot; or find a slightly narrower can.
Last night I cooked millet for my family's dinner: 2c water + 3/4c millet. Water boiled in 9.5 min, added grain and came back to a boil within a minute, cooked for 25min at which point I removed it from the fire even though it could have simmered longer. Greeaat!
Yesterday I found a smaller can that will fit inside of a heineken/fosters canpot. Two options: 10oz tomato product that is a bit taller or 8.5oz vegetables; i got the shorter one and did the middle design I pictured so it has removable legs. The boil time was slower ~12 minutes, then it simmered for ~20 minutes."
Mike Elliott
|
| Mike Lancaster's no stake pot support |
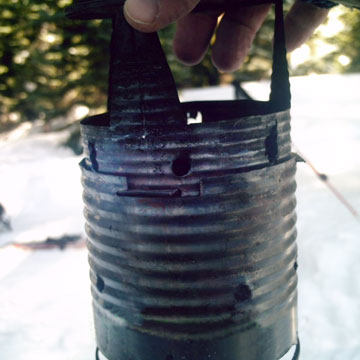
Mountain Man Mike says:
"iI interlocked a can the size you use as the wood stove into an equal length portion of a larger in diameter chicken stock can. This enabled me to avoid the perils of tent stakes as pot stands, provide a very stable base and pot rest, integrate the two stoves and have a larger burn area."
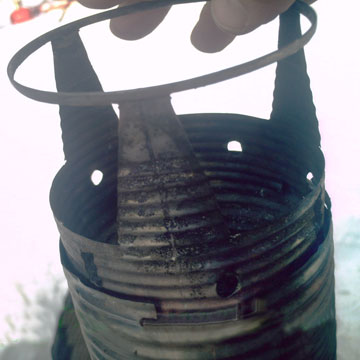
The smaller can locks into the top to make a solid pot support. Upside down it fits into to stove for packing.
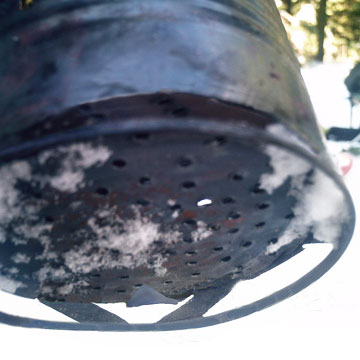
This shows how Mike raised the vented bottom to maintain an efficient primary air supply.
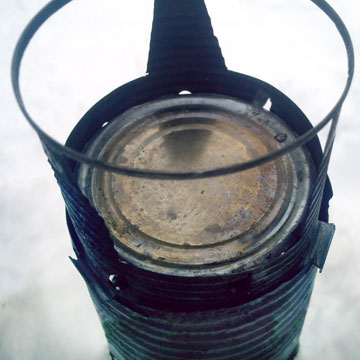
A small diced chili can fits into the pot support to hold the Penny Alcohol stove at the correct hight.
Mike says that "Both made it for the entire stretch of the JMT and I use the same stoves I built 4 1/2 years ago. Since there is a fair amount of hiking in a no burn area along the JMT, I found incorporating the Penny Wood and Penny Alcohol designs most beneficial. In addition, I prefer to cook my home dried food in the evening rather than boil some water and stir scary stuff into a pouch. ... I have used half of the wood stove as a pot riser and tented the entire stove and pot with the foil windscreen, vented the top and baked in it. We enjoyed a fresh baked chocolate cake with raspberry glaze several days into a long hike and the birthday was one for the memory books."
Check out Mike's cooking advise
|
Back To FAQ's
To The Top
|
| |
| |
WARNING!!!
The pot support used for this stove could be VERY DANGEROUS when the pot is removed. Falling on the support could cause major damage. Always remove the support or turn upside down when not cooking.
Information on this site is provided
for educational purposes only.
Neither the webmaster nor anyone else
whose information may be included on, or linked to, this web site
can attest to or endorse the safety of using any techniques, equipment,
supplies or services evaluated or referred to therein. Any endorsement
or recommendation is limited solely to the evaluator's opinion about
their effectiveness when used for their intended purpose in accordance
with safe operating procedures, and if available, in accordance with
any instructions provided by the inventor or manufacturer. Some survival
and outdoors equipment and supplies are inherently unsafe and can
injure, maim or kill even when used appropriately.
Endorsement or recommendation of any equipment, supplies, services
or techniques does not constitute a guaranty or warranty the equipment,
supplies, services or techniques will function when needed.
In daylight you may not be able to see a flame or hear an audible
sound from an alcohol stove. A windscreen wrapped partially
around the stove may aid in seeing a flame more easily.
Individuals not trained and experienced in use of tools and techniques
mentioned on this page should not attempt creating a stove without
supervision by someone with proper experience and training.
Eye protection should be worn whenever flying metal is possible (such
as whenever a drill, hammer or knife is used).
Lighting of stoves should be attempted in a area not prone to fire.
Use of gasoline, or any other petroleum products in these stoves may
result in severe burns and/or death.
|


 This little beauty seems to be perfect for smaller pots but too unstable for large ones. Note how the Foster's heat reflector completely seals at the top - forcing all the hot air into the secondary air supply holes. Norman built


